Root Cellar Basics: How to Store Food Without Electricity for Year-Round Resilience
Master the ancient craft of root cellaring. Learn how to store potatoes, carrots, onions, and winter squash through winter without a single watt of electricity.
Disclosure: This post contains affiliate links. As an Amazon Associate, we earn from qualifying purchases at no extra cost to you. We only recommend products we believe are genuinely useful for home food preservation.
In our modern era of high-tech smart appliances, frost-free electric refrigerators, and massive chest freezers, the idea of storing hundreds of pounds of fresh food without running an electric compressor sounds almost impossible.
Yet for thousands of years before electrical power grids existed, human civilizations survived freezing winters, late spring blizzards, and prolonged droughts by mastering subterranean cold storage.
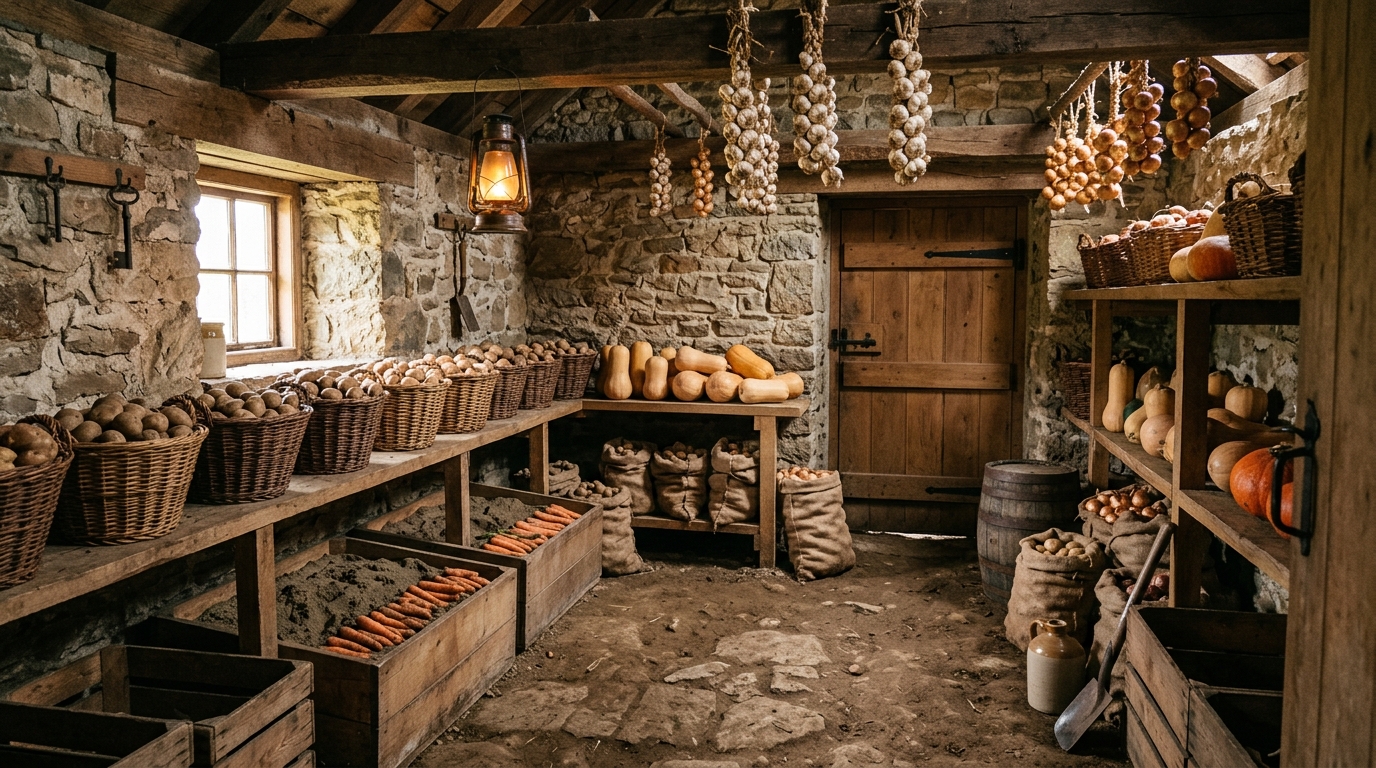
A root cellar represents the pinnacle of passive ecological design. By using the natural insulating mass of the surrounding earth, a root cellar maintains cold, above-freezing temperatures and elevated relative humidity throughout the bitterest winter months.
Unlike home canning, which requires hours of boiling water bath heat, or dehydration and freezing, which alter food texture, root cellaring preserves living vegetables in their natural, raw state. Carrots remain crunchy, potatoes retain their earthy sweetness, apples remain aromatic, and winter squashes stay dense and savory for six to nine months.
Furthermore, relying entirely on electric freezers leaves your food security vulnerable to winter storm blackouts and grid failures.
A root cellar never experiences a power outage. It runs completely silent, generates zero carbon emissions, requires zero monthly utility costs, and provides an unshakeable foundation for family self-reliance.
“Root cellaring is the quiet art of cooperating with the earth. When you harness subterranean coolness and humidity, hundreds of pounds of autumn crops stay fresh, crisp, and alive for nine months without burning a single watt of power.”
Whether you own a historic stone basement, plan to partition a cold corner in an unheated modern garage, or want to bury a simple earth-cooled barrel in your backyard garden, this comprehensive guide covers the science, microclimates, curing protocols, and essential equipment needed to store your autumn harvest successfully.
The Physics of Underground Cold Storage
To understand why root cellars work so reliably, one must examine how geothermal mass interacts with atmospheric air.
+------------------------------------------------------------------------------------+
|                         ROOT CELLAR PHYSICAL PRINCIPLES                            |
+------------------------------------------------------------------------------------+
|  1. Geothermal Heat Sink: Soil below the frost line stays at 50°F to 55°F year-round.|
|  2. Evaporative Humidity: Moist subsoil maintains 85% to 95% relative humidity.    |
|  3. Convection Ventilation: Cool air enters at floor level; warm air vents at roof.|
|  4. Darkness: Complete absence of sunlight prevents chlorophyll sprouting.         |
|  5. Ethylene Separation: Fruit gases must vent separately from root crops.         |
+------------------------------------------------------------------------------------+
The Thermal Flywheel of Earth Sheltering
Just six to ten feet below the soil surface, the ground temperature remains remarkably stable at approximately 50°F to 55°F (10°C to 13°C) throughout the entire year, regardless of whether surface air is baking at 95°F in July or freezing at -10°F in January.
By shielding a storage space beneath earth or surrounding it with thick masonry walls, you tap into this enormous thermal flywheel.
In late autumn, cold night air is vented into the room to drop the temperature into the ideal storage range of 32°F to 40°F (0°C to 4°C), and the surrounding earth insulates the chamber, preventing outside freezing winds from penetrating inside.
The Role of High Relative Humidity
The second critical factor is moisture. While dry pantry storage requires low humidity to prevent mold, dormant living root crops (like carrots, beets, turnips, and parsnips) are over eighty percent water.
If placed in a standard modern refrigerator, which has dry air circulating constantly, moisture evaporates through root skin within weeks, turning plump roots into rubbery, shriveled sticks.
A traditional root cellar maintains an elevated relative humidity between 85% and 95%. This prevents moisture transpiration, keeping cellular walls turgid and crisp until late spring.
The Four Microclimate Storage Zones
A successful storage master understands that different garden crops require completely different temperature and humidity conditions. Grouping all vegetables together in a single damp bin is the fastest way to ruin a harvest.
Every root cellar and storage room naturally subdivides into four environmental zones:
| Storage Zone | Target Temperature | Target Humidity | Ideal Vegetables & Fruits | Storage Method |
|---|---|---|---|---|
| Zone 1: Cold & Very Moist | 32°F to 38°F (0°C to 3°C) | 90% to 95% | Carrots, beets, parsnips, turnips, rutabagas, winter radishes, celery | Damp sand, damp sawdust, or perforated plastic bags |
| Zone 2: Cold & Moist | 35°F to 40°F (2°C to 4°C) | 80% to 90% | Potatoes, cabbage, Brussels sprouts, leeks, apples, pears | Ventilated wooden crates, slatted bins, or burlap sacks |
| Zone 3: Cool & Dry | 32°F to 40°F (0°C to 4°C) | 60% to 70% | Onions, garlic, shallots | Hanging mesh sacks, braided stems, or shallow wire baskets |
| Zone 4: Warm & Dry | 50°F to 60°F (10°C to 15°C) | 50% to 65% | Winter squash (butternut, acorn, delicata), pumpkins, sweet potatoes | Open wooden shelves in a cool bedroom, closet, or heated basement |
+------------------------------------------------------------------------------------+
|                         ROOT CELLAR STORAGE ZONES                                  |
+------------------------------------------------------------------------------------+
|                                                                                    |
|  [CEILING / UPPER SHELVES]   ->  WARMER & DRIER: Onions, Garlic, Shallots          |
|  [MIDDLE SHELVES]            ->  COOL & MODERATE: Apples, Pears, Cabbage           |
|  [FLOOR / LOWEST SHELVES]    ->  COLDEST & MOISTEST: Potatoes, Carrots in Sand     |
|                                                                                    |
+------------------------------------------------------------------------------------+
The Critical Ethylene Rule
Apples and pears produce high volumes of ethylene gas as they ripen. Ethylene is a natural plant hormone that triggers senescence and sprouting in neighboring vegetables.
If you store bushels of apples right next to your seed potatoes, the potatoes will break dormancy, grow long pale eyes, and turn soft and bitter.
Furthermore, ethylene causes carrots to develop a foul, bitter chemical taste within four weeks. Always store apples and pears on separate high shelves near an exhaust vent, or wrap each apple individually in brown paper to contain volatile gases.
For principles on dry pantry goods that complement your root cellar, consult our comprehensive guide on Freezer, Pantry and Shelf-Stable Basics.
Harvesting and Curing: The Secret to Long-Term Storage
The single most common reason stored root crops rot in November is inadequate curing. You cannot pull a potato from damp garden soil and toss it directly into a cold cellar bin; the skin is fragile, bruised, and colonized by soil microbes.
Curing is a deliberate post-harvest conditioning phase where root crops heal surface cuts, thicken their outer periderm skin, and lower internal moisture, creating an impenetrable biological barrier against fungal pathogens.
+------------------------------------------------------------------------------------+
|                         HARVEST AND CURING PROTOCOLS                               |
+------------------------------------------------------------------------------------+
|  A. Potatoes                                                                       |
|     * Wait 2 weeks after garden vines die back before digging.                     |
|     * Cure at 60°F to 65°F at 85% humidity in darkness for 10 to 14 days.          |
|     * NEVER expose to sunlight (prevents toxic green solanine production).         |
+------------------------------------------------------------------------------------+
|  B. Onions and Garlic                                                              |
|     * Harvest when tops fall over; cure in warm, airy shade for 3 to 4 weeks.      |
|     * Skins turn papery and dry; necks shrink and close tightly.                   |
+------------------------------------------------------------------------------------+
|  C. Winter Squash and Pumpkins                                                     |
|     * Cut with 2 inches of woody stem attached (never snap the stem off).          |
|     * Cure in warm sunshine or 75°F to 80°F room for 10 days to harden rinds.      |
+------------------------------------------------------------------------------------+
Detailed Curing Rules by Crop
1. Potatoes
Two weeks before harvesting main-crop storage potatoes, mow or clip down the dead foliage. This signals the subterranean tubers to set their skins.
Dig potatoes carefully on a dry, overcast day using a broadfork, taking care not to puncture skins with fork tines. Gently brush off loose dirt, but never wash storage potatoes with water. Washing drives fungal spores deep into microscopic lenticels.
Spread unwashed tubers in shallow cardboard boxes in a dark, warm, well-ventilated room (60°F to 65°F) for ten to fourteen days. During this curing window, skin cuts callus over into protective scars. Once cured, transfer them to their permanent cold cellar location.
2. Carrots, Beets, and Parsnips
Unlike potatoes, root crops like carrots, beets, and parsnips do not require warm skin curing. Instead, wait until autumn frost touches your garden.
Frost causes these plants to convert complex starches into sweet natural sugars, acting as a natural biological antifreeze. Dig roots, brush off excess soil, and immediately slice off the leafy green tops one-quarter inch above the root crown.
If you leave leafy green tops attached, the foliage continues to transpire, siphoning moisture out of the root within days.
3. Onions, Garlic, and Shallots
Harvest alliums when half the leafy tops have fallen over naturally. Spread them in a single layer on slatted tables or hang them in loose bunches beneath an open porch, carport, or well-ventilated barn out of direct sun.
Allow them to dry for three to four weeks until the outer wrapper leaves turn crispy and the thick stem necks shrivel completely shut. Once the neck is dry, trim tops to one inch or weave stems into decorative braids.
If you are harvesting crops from raised garden beds, review our budget construction strategies in Raised Bed Gardening on a Budget.
Masterclass: The Damp Sand Storage Technique
For long-term storage of carrots, beets, turnips, and celery roots, the damp sand method is the undisputed champion of traditional preservation.
+------------------------------------------------------------------------------------+
|                         DAMP SAND STORAGE CROSS-SECTION                            |
+------------------------------------------------------------------------------------+
|                                                                                    |
|  [Sand Cover: 2 Inches]     ->  Clean, Slightly Damp Play Sand                     |
|  [Vegetable Layer 2]        ->  Carrots or Beets Arranged in Rows (Not Touching)   |
|  [Sand Divider: 1 Inch]     ->  Clean, Slightly Damp Play Sand                     |
|  [Vegetable Layer 1]        ->  Carrots or Beets Arranged in Rows (Not Touching)   |
|  [Sand Base: 2 Inches]      ->  Clean, Slightly Damp Play Sand                     |
|                                                                                    |
|  ==================== HEAVY WOODEN OR PLASTIC BIN BASE ==========================  |
+------------------------------------------------------------------------------------+
How to Build a Sand Storage Box
- Choose Your Container: Use sturdy wooden crates, food-grade plastic bins, or five-gallon buckets. If using solid plastic bins, drill a few quarter-inch ventilation holes along the sides to allow light air exchange.
- Select the Sand: Purchase washed, coarse mason sand or children’s sandbox play sand from a building supplier. Never use salty beach sand or fine clay dirt.
- Moisten the Sand: The sand must be barely damp, like a well-wrung sponge. If you squeeze a handful of sand, it should hold its shape without dripping a single drop of water. Excessively wet sand causes roots to rot or sprout white feeder roots.
- Layering the Roots: Pour a two-inch layer of damp sand across the bottom of the container. Arrange your trimmed, unwashed carrots or beets horizontally across the sand, ensuring that roots do not touch one another.
Keeping space between roots ensures that if one carrot develops an isolated decay spot, the mold cannot jump to neighboring roots. 5. Cover and Repeat: Pour an inch of sand over the vegetables, ensuring all gaps are filled. Add another layer of roots, alternating directions. Finish with two inches of damp sand over the top layer. 6. Winter Maintenance: Check the box once a month. Dig out any soft roots and consume them immediately. If the top layer of sand begins to dry out to a pale powder, lightly mist the surface with a spray bottle of clean water.
Carrots stored in damp sand remain sweet, firm, and succulent for six to eight full months.
Essential Equipment for Modern Root Cellaring: 2026 Reviews
While ancient cellars were primitive stone holes in hillsides, modern food preservers utilize precision digital monitoring and hygienic, breathable storage containers to guarantee zero crop loss.
Below are three verified, high-performance tools available on Amazon that protect your harvest from mold rot, excess humidity, and pests throughout winter.
ThermoPro TP50 Digital Hygrometer and Indoor Thermometer
Best for: Monitoring precision temperature and humidity levels inside root cellars, basements, and pantries
- High-accuracy sensors measure temperature within 1 degree and humidity within 2 to 3 percent
- Comfort air indicators display dry, comfort, or wet icons instantly
- Records daily high and low records for temperature and humidity
- Multiple mounting options: tabletop stand, magnetic back, and wall mount
- Screen does not feature a continuous backlight
Maintaining proper storage conditions requires exact real-time environmental data. Guessing the temperature and humidity inside your basement or root cellar based on how your skin feels is a guaranteed recipe for ruined produce. If temperatures drop below 32°F, potatoes freeze and turn to black mush; if humidity drops below 80%, carrots shrivel into limp leather.
The ThermoPro TP50 Digital Indoor Thermometer and Hygrometer is the most reliable climate monitor for home food storage.
Equipped with high-precision commercial-grade sensors, it measures temperature within one degree Fahrenheit across a wide range (-58°F to 158°F) and tracks relative humidity within two to three percent.
The large, bold digital LCD screen displays comfort air indicator icons (dry, comfortable, or wet) that alert you instantly if humidity levels drift out of the target zone.
Furthermore, the unit records twenty-four-hour high and low extremes, allowing you to see exactly how cold your cellar became during the middle of the night without staying awake to check.
With a fold-out tabletop stand, a magnetic back that snaps securely to metal shelves, and a wall mount slot, it mounts anywhere effortlessly.
Sandbaggy Natural Jute Burlap Potato and Root Storage Bags
Best for: Storing potatoes, onions, carrots, and winter squash in cool, dark environments
- 100% natural, biodegradable woven jute fibers
- Breathable loose weave allows optimal air circulation while blocking light
- Absorbs excess surface humidity without rotting
- Durable heavy-duty stitched seams hold up to 50 pounds of root produce
- Natural jute has a distinctive earthy burlap scent initially
Storing hundreds of pounds of potatoes, onions, and winter squashes in solid plastic tubs or sealed containers traps moisture and respiration heat, creating a humid microclimate where bacterial soft rot spreads like wildfire.
The Sandbaggy Natural Jute Burlap Storage Bags provide the ideal storage vessel for heavy autumn harvests.
Manufactured from one hundred percent natural, biodegradable woven jute plant fibers, these heavy-duty burlap sacks allow continuous three-hundred-and-sixty-degree air circulation around your produce.
The natural loose weave blocks out ambient light to prevent potatoes from turning green and bitter, while absorbing surface moisture condensation that forms when cellar temperatures fluctuate.
Unlike thin imported bags that rip along seams, these sacks feature heavy-duty reinforced industrial stitching capable of holding up to fifty pounds of dense tubers.
They can be washed, air dried, and reused year after year, providing durable off-grid storage that keeps your harvest fresh without chemical coatings or single-use plastics.
XILIDIA 4-Pack Stackable Metal Wire Storage Baskets
Best for: Organizing root crops, squash, and pantry staples with open ventilation
- Open grid design provides 360-degree airflow around stored produce
- Modular stacking system maximizes vertical cellar and pantry space
- Foldable handles allow easy carrying and stable stacking
- Rust-resistant powder coated metal construction
- Small shallots or baby potatoes may slip through wire grid without a liner
Managing root cellar inventory requires clear visibility and easy access. Piling squash, garlic braids, and cabbages into deep wooden bins means you cannot see rotting items at the bottom until bad odors appear.
The XILIDIA 4-Pack Stackable Metal Wire Storage Baskets provide the ultimate modular organization system for root cellars, basements, and home pantries.
Constructed from heavy-duty rust-resistant powder-coated iron wire, these baskets feature an open-grid design that guarantees complete cross-ventilation around every piece of produce, preventing stagnant air pockets that foster mold spores.
The modular design allows you to stack all four baskets vertically, tripling your storage capacity without taking up valuable floor space.
Foldable drop-down handles let you lift and carry individual baskets out to the kitchen with ease, while the open front scooping mouth allows you to reach in and grab potatoes or onions without unstacking the bins.
They keep produce elevated off damp concrete floors, safe from crawling insects and dampness.
Equipment Comparison Matrix for Root Cellar Storage
To assist your cold storage setup, the following table details the key features and specifications of these core tools:
| Product | Primary Purpose | Material / Build | Capacity / Specs | Key Advantage |
|---|---|---|---|---|
| ThermoPro TP50 Hygrometer | Precision climate tracking | High-accuracy digital sensor & LCD | 24-hour high/low records (-58°F to 158°F) | Eliminates temperature guesswork; prevents freezing |
| Sandbaggy Burlap Sacks | Bulk root crop storage | 100% natural woven jute fibers | Holds up to 50 lbs per bag | Blocks light while allowing 360-degree ventilation |
| XILIDIA Wire Baskets | Modular produce organization | Rust-resistant powder-coated wire | 4-pack stackable vertical bins | Maximum airflow; open-front access for easy rotation |
For dry pantry staples and long-term shelf-stable goods, see our companion evaluation of the Best Reusable Food Storage Containers.
Alternative Cold Storage Solutions for Modern Homes
What if you live in a suburban home with a heated concrete basement, an apartment, or a home without a traditional underground root cellar? You can still utilize passive cold storage by adapting simple microclimates:
+------------------------------------------------------------------------------------+
|                         ALTERNATIVE COLD STORAGE OPTIONS                           |
+------------------------------------------------------------------------------------+
|  1. The Basement Partition: Frame an insulated cold room in the northeast corner.   |
|  2. The Buried Garbage Can: Inset an unpainted metal trash can in garden soil.     |
|  3. The In-Ground Garden Clamp: Insulate carrots and parsnips under thick straw.   |
|  4. The Bulkhead Entrance: Use cold concrete steps of an exterior storm cellar.    |
|  5. The Unheated Garage Closet: Insulated wooden box fitted with a low wattage bulb.|
+------------------------------------------------------------------------------------+
1. Partitioning a Basement Cold Corner
If your basement contains a central heating furnace, the ambient temperature is likely 65°F to 70°F, far too warm for root crops.
However, you can frame off a small eight-by-ten-foot room in the coldest corner of the basement (preferably facing north or east).
Insulate the interior partition walls with rigid foam board, install a weatherstripped exterior door, and add an adjustable vent to an exterior basement window.
By cracking the window vent during winter, you let cold outside air flow into the partitioned room, dropping the temperature to 38°F while the rest of your basement stays warm.
2. The Buried Galvanized Can Cellar
For small-scale homesteaders, an in-ground garbage can cellar is cheap, fast, and remarkably effective.
Dig a hole in a well-drained, shaded spot in your garden large enough to sink a thirty-gallon galvanized metal trash can so its rim sits three inches above ground level.
Drill a few drainage holes in the bottom, add three inches of gravel for drainage, and layer in carrots, potatoes, and cabbages wrapped in straw.
Secure the metal lid tightly to exclude rodents, and cover the entire lid with a thick straw bale topped with a waterproof tarp.
Throughout freezing winter weather, the surrounding earth keeps produce from freezing, and you simply lift the straw bale to retrieve crisp fresh vegetables.
3. The Garden Clamp (Leaving Roots in the Ground)
The simplest storage method of all is leaving cold-hardy root crops right where they grew in your garden.
Parsnips, carrots, rutabagas, and leeks can survive freezing ground temperatures if you insulate the garden bed with twelve to eighteen inches of clean dry straw or shredded autumn leaves topped with floating row cover before hard freezes hit.
The thick mulch blanket prevents ground soil from freezing solid, allowing you to pull back the straw and shovel up crisp, sugary sweet roots in the middle of January.
Weekly Cellar Inspection: The One Rotten Apple Rule
Root cellaring is not a set-it-and-forget-it system. Stored vegetables are living biological organisms that slowly breathe, release moisture, and eventually succumb to natural decay.
Establish a rigid weekly cellar audit routine:
- Check Climate Monitors: Glance at your ThermoPro TP50 to ensure temperatures stay between 34°F and 38°F. If the room approaches freezing, close outside ventilation baffles. If temperatures climb above 45°F, open vents on cold nights.
- The Sniff Test: When you open the cellar door, take a deep breath. A healthy root cellar smells earthy and sweet, like a fresh forest floor after rain. A sharp sour odor or foul sulfur smell indicates that a cabbage or potato has begun to rot.
- Rotate and Cull: Gently inspect your produce. As the old proverb warns, a single rotten potato or apple will quickly spoil the entire bin. Immediately remove any root exhibiting soft spots, mold, or wrinkling. Use slightly blemished produce in that evening’s soup pot, keeping only pristine roots in long-term storage.
Frequently Asked Questions About Root Cellaring
Can I store onions and potatoes together in the same bin?
No, never store onions and potatoes in the same container or close together.
Potatoes release moisture and small amounts of natural gases that cause dry onions to absorb humidity, break dormancy, and sprout green shoots.
Conversely, onions emit volatile sulfur and ethylene compounds that accelerate potato decay.
Keep your potatoes down near the cold, humid floor in breathable burlap sacks, and place onions high up on open shelves in well-ventilated wire baskets where air is warmer and drier.
What should I do if my root cellar humidity is too low?
If dry air is causing root crops to shrivel, you can easily boost humidity through simple passive methods:
- Wet the concrete or dirt floor with a watering can once or twice a week.
- Set out shallow pans or broad buckets filled with clean water; natural evaporation raises ambient relative humidity.
- Drape clean, damp burlap sacks over potato crates.
How do I prevent mold from growing on root cellar walls?
Mold flourishes when humidity is high and air is completely stagnant.
Ensure your cellar features two-point convection airflow: a low intake vent bringing cold air in near the floor, and a high exhaust vent on the opposite wall allowing stale air to exit through the ceiling.
Additionally, paint masonry or concrete cellar walls with agricultural hydrated lime whitewash (calcium hydroxide) every two years. Whitewash is a natural, non-toxic mineral coating with an alkaline pH that completely suppresses fungal and bacterial growth on surfaces.
Are green potatoes safe to eat if I cut off the green parts?
When potatoes are exposed to sunlight or fluorescent light, their skins produce green chlorophyll. Along with chlorophyll, the potato synthesizes solanine, a toxic glycoalkaloid chemical that causes stomach cramps, nausea, and headaches.
If a potato develops a tiny green blush, peeling away the green skin and underlying green flesh generously removes most of the toxin.
However, if a potato is green throughout or tastes unpleasantly bitter, discard it immediately. Never feed green potatoes to livestock or family members.
Do I need to wash dirt off root vegetables before storing?
No. Never wash vegetables before placing them in cold storage.
Washing adds surface moisture that encourages bacterial soft rot and removes the natural protective soil microflora that guards root skin.
Simply let the roots dry briefly on harvest day, gently brush off clods of dry soil with a soft gloved hand, and store with a thin coating of garden dirt intact.
Final Verdict and Your Winter Resilience Roadmap
Root cellaring transforms food storage from an expensive, energy-hungry burden into an elegant, earth-sheltered craft that honors the natural seasons.
By understanding the distinct requirements of each storage zone, practicing disciplined autumn curing, maintaining proper ventilation, and using dependable, breathable equipment, you can feed your family fresh, home-grown produce throughout the coldest months of winter without using a single kilowatt of electricity.
Equip your root cellar with proven gear:
- Track environmental parameters with precision using the ThermoPro TP50 Digital Hygrometer and Thermometer.
- Store heavy potato and root yields in breathable Sandbaggy Heavy-Duty Natural Jute Burlap Bags.
- Organize and aerate squashes, onions, and cabbages with XILIDIA Stackable Metal Wire Storage Baskets.
Set up your cold room, monitor your storage climate, rotate your inventory weekly, and experience the quiet peace of mind that comes with a winter cellar filled to the rafters with living, homegrown food.
Explore Related Guides in Our Network
- Master safe food rotation and pantry planning: Freezer, Pantry and Shelf-Stable Basics
- Protect dry staples and pantry goods with airtight seals: Best Reusable Food Storage Containers
- Build fertile raised beds for heavy root vegetable harvests: Raised Bed Gardening on a Budget
- Master indoor propagation and seed starts: Best Seed Starting Kits Guide
- Return to the Food Storage Hub or explore the Food Preservation Hub